Third Vionnan-Molvanian War
| Third Vionnan-Molvanian War | |||||||
|---|---|---|---|---|---|---|---|
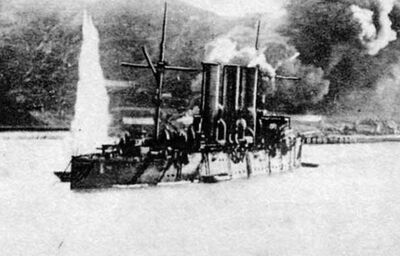
 HMNS Orion under fire from Molvanian defences in Dragovich | |||||||
| |||||||
| Belligerents | |||||||
|
|
| ||||||
| Commanders and leaders | |||||||
|
|
| ||||||
| Casualties and losses | |||||||
| 8,911 Dead | 9,412 Dead | ||||||
The Third Vionnan-Molvanian War, or Third Imperial-Molvanian War, was a war fought in 1897 between Vionna-Frankenlisch and Molvani over a number of territorial disputes. The war ended when Belvania offered to mediate and the Treaty of Belvin reconciled the two nations, none of the territorial disputes were resolved but the two nations reached a steady peace and even fought alongside each other in the Great Europan War. The war cost a combined 18,323 lives and around 100,000 other casualties, around 30,000 of which were recoverable losses such as repatriated prisoners of war and recovered wounded and sick men.
Declaration of War
War was declared on the 7th of February at two in the afternoon. The Molvanian ambassador in Frankenlisch handed the Imperial Foreign Minister a final message declaring that a state of war then existed between Vionna-Frankenlisch and Molvani. Due to the unreliable communication methods of the day, the message did not reach many military units for hours and the fort and naval command in Dragovich was not informed until nine in the evening when Admiral Cadensk Dzendrich was hosting Admiral Lord Hood of the Imperial Navy aboard his flagship, TNV Murmansk. Admiral Hood was in Dragovich aboard HMNS Dreadnought on its maiden voyage (a diplomatic tour of the continent). Dreadnought never received word that war had broken out and it wasn't until the ship was boarded and the First Battle of Dragovich broke out that Hood and his men realised that the situation between Molvani and Vionna-Frankenlisch had escalated to war.
Dragovich Campaign
The Imperial Fleet immediately mobilised for war and on the 10th of March, bolstered by HMNS Dreadnought which had miraculously escaped its predicament at Dragovich, it sailed out of Frankenlisch and Luxington. Six Battleships, ten Cruisers and twenty Destroyers along with transports carrying twenty-thousand men of the Imperial Marines made up the Dragovich expedition. The Dragovich Naval Station had been bolstered by a force of two battleships and three cruisers and the damaged ships had been more or less repaired. This force was organised into the Molvanian Northern Squadron and it put out to sea on the 12th of March.
The two fleets met off the coast of Garograd and a short battle was fought. Lord Hood had returned to Frankenlisch aboard Z-71, a captured Molvanian torpedo boat, pending personal orders, so the Imperial fleet off Garograd was commanded by Rear Admiral William Porter. The encounter was too sudden for a proper line of battle to be formed by either side so the engagement quickly turned to gunnery duels between larger vessels. Naturally, with more capital ships, the Vionna-Frankenlischians won this fight with few casualties on either side. The Northern Squadron was forced back to Dragovich.
On March 18th, General Richard Acton landed his marines six kilometres downcoast from Dragovich while Admiral Porter's fleet sailed on Dragovich Bay. On the 25th of March, Porter ordered an attack on the port. The Imperial fleet sailed past in a line of battle under intense fire from the shore batteries while Force A, a hastily assembled splinter-group, sailed into Dragovich Bay to neutralise the ships there. Led by Commodore James Eccleston aboard HMNS Orion, the force succeeded in neutralising multiple Molvanian ships but found itself pinned under heavy gunfire from shore emplacements. The Second Battle of Dragovich ended in a lucky Imperial victory when General Acton's marines arrived to carry the emplacements and relieve the fleet. Dragovich was captured but much of the 3,000-man garrison escaped during the fighting, along with General Stuk and Admiral Dzendrich.