User:Tranvea/Sandbox2
| 1983 Solarian Sea Crisis | |||||||
|---|---|---|---|---|---|---|---|
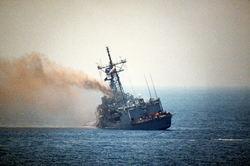
 The CN Tapahanek listing following the Zorasani air attack | |||||||
| |||||||
| Belligerents | |||||||
|
|
| ||||||
| Commanders and leaders | |||||||
|
|
| ||||||
| Strength | |||||||
|
Second incident:
Third Incident:
|
First incident:
Second incident:
Third incident:
| ||||||
| Casualties and losses | |||||||
|
31 killed 78 injured 1 frigate heavily damaged 2 aircraft destroyed |
18-29 killed or injured 18 aircraft destroyed 8 aircraft damaged | ||||||
| 1 civilian freighter seized, later returned | |||||||
The 1983 Solarian Sea Crisis was an eighteen day military confrontration between the Union of Zorasani Irfanic Republics and Halland that took place between 10 and 28 April 1983.
The crisis began with the seizure of the MS Solar Intrepid, a civilian frieghter under the Hallandic flag, accused by the Zorasani government of smuggling weapons to Irvadi separatists. this was denied by the Hallandic government. In response, Halland dispatched several naval vessels to patrol the Solarian Sea shipping lanes and to protect other Hallandic-flagged vessels. On 14 April, the CN Tapahanek was attacked by a single Zorasani aircraft, striking the vessel with two Kh-35 missiles, killing 27 sailors and injuring 78 others.
This led to the deployment of Halland's 1st Carrier Strike Group led by CN John Astor, which arrived off the western coast of Tsabara on 26 April. On the 27 April, the CSG launched an airstrike against the airbase blamed for the Tapahanek attack, in the ensuing operation, John Astor launched aircraft struck the Ain Samad Airbase, destroying 12 aircraft and damaging 8 more and killing between 30 to 80 personnel. A air battle between the egressing carrier air group and Zorasani air force aircraft saw a further five shot down, while Halland lost two aircraft.
The crisis was formally resolved the next day, with the withdrawal of the 1st Carrier Strike Group and the start of high-level bi-lateral talks between the Hallandic and Zorasani governments. The MS Solar Intrepid was returned with its crew and both sides agreed to monetary compensation for the military personnel killed during the crisis. The events proved highly consequential to both governments, with Halland's military prowess and capabilities confirmed, while Zorasan's military would go on to begin a decades long modernisation and reform process.
Background
Hallandic involvement in Zorasani unification
Tensions between Zorasan and Halland had existed prior to 1983, primarily over Halland’s involvement in assisting states opposed to Zorasani unification, led by the Union of Khazestan and Pardaran. Much like the Euclean powers, Halland’s involvement had peaked during the 1960s, with materiel and training support for the militaries of the Badawiyan monarchies. Between 1952 and 1974, Halland provided significant support to the Riyhadi Confederation, including the sale of equipment, aircraft and even naval vessels.
From 1952 until 1965, Halland’s presence in Riyadha was limited to merely logistical support and officer training. Halland’s involvement coincided with Estmerish missions to the small state aimed at building up the Emirates’ ability to defend themselves militarily against the superior forces of the UKP. On average, the number of Hallandic personnel in the country rarely exceeded 200, yet on occasion these personnel became the targets of the Pan-Zorasanist group, the Black Hand. In one such incident, 3 Hallandic army trainers were killed when the Black Hand bombed the Royal Palm Hotel in At-Turbah on 19 June 1961.
During the Badawiyan War, in which Riyadha as part of the Mubaraz Pact fought against the Union of Khazestan and Pardaran, Halland alongside Estmere maintained a steady and uninterrupted supply of materiel to At-Turbah, leading to many historians crediting both states to keeping the confederation in the war and able to survive a succession of UKP offensives. With the Pact’s defeat in 1968, Euclean and Hallandic diplomatic support succeeded in maintaining Riyadha’s independence, however, in turn it forced the country in ever increasing reliance upon its allies for economic and political stability.
Al-Thawra Uprising
Events
MV Solar Intrepid Seizure
CN Tapahanek Attack
Operation Narwhal
Following the heavy damage caused to CN Tapahanek and the subsequent ship's internment in Zorasan, the Commonwealth Navy immediately mobilized forces from the 1st Fleet, assigned to the Vehemens Ocean, towards the Solarian Sea. The Carrier Strike Group sent was later joined by Etrurian, TBD and TBD vessels on its way. News of the mobilization came to the attention of the government of Zorasan, along with a formal demand on behalf of Halland's government to immediately return the apprehended civilian vessel, compensate the material damage and lives taken by the attack and formally apologize. Zorasan's government denied any response, intensifying patrol of its territorial waters.
On 26 April, Task Force 17 and its Carrier Strike Group, composed of aircraft carrier CN John Astor, escorted by CN Gerald Perry and 4th Destroyer Squadron arrived at the western coast of Tsabara. Without official Zorasani government response, Halland's government authorized a tactical retaliatory strike against Ain Samad airbase. The attack would be done in two waves at rapid succession, with the objective to suppress air defences and neutralize the airfield. At 4:13 AM 8 F4G from VFA-13 took off, flying through Tsabara's airspace at low altitude, armed with anti-radiation missiles. Soon after, at 4:20 AM, 12 F10G2 strike fighters from VFA-11, which recently replaced the previous air defense specialized variant in the squadron, took off armed with Vixen 3 missiles and guided bombs. Shortly after an early warning and control aircraft took off, flying at a 20km radius orbit in international waters in the vicinity of Zorasani airspace.
The SEAD operation undertaken by VFA-13 flew through Tsabaran airspace at low altitudes, with the aircraft ingressing Zorasani airspace at 5:22 AM. The eight aircraft, divided into two flights of four aircraft each were tasked with rapid destruction of Ain Samad's stationary air defense batteries. Low altitude flight and coordinated Wild_Weasel tactics allowed for the rapid destruction of the airbase's radars, two S-75launch batteries and one Kub battery. The airbase quickly initiated a scramble, calling for the takeoff of all fighter aircraft on station - the majority of which were SAI H-03? aircraft. Before any interceptor could take off to catch the egressing aircraft from VFA-13, VFA-11 was already ingressing with 12 aircraft, dropping over 18 tons of bombs in the airfield in a span of 5 minutes. The first attack caused a large sized crater in the center of the runway and destroyed one fighter taking off, effectively blocking the runway from used. Subsequent attacks destroyed hangars, destroying 12 more aircraft and damaging further 8. Casualties reported by the government of Zorasan were four deaths and at least 11 injured at the time of bombing. One pilot was killed and 3 maintenance workers, with most injured being workers in the airbase. The use of guided munitions was, according to Halland's press release announced the same day, to minimize collateral damage and ensure the "tactical nature of the retaliation to prevent further capability of aggression on behalf of Zorasan's government while minimizing effects on unrelated personnel".
Following VFA-11's eggress, bearing southwest before turning back northwest to its carrier, the Zorasani Irfanic Revolutionary Air Force ordered interception of the strike force from two vectors. The XX squadron, equipped with 12 new |SAI H-09 Asefeh fighters manned by veterans of the Irvadistan War took off from Gharaf Air base, while 12 more SAI H-03 interceptors from XX squadron took off from Hazaza. The F10G2s managed to outrun the older and slower SAI H-03, whose interception vector was not in their favour. However, VFA-11 met with XX squadron at 6:04 AM. The larger radards from the F10G and longer range missiles gave them an initial advantage, with three H-09s shot down in the initial exchange, and one F10G shot down. One H-09 pilot, ZORASANI NAME, managed to succesfully eject after being shot down, while the others were killed in action.
Orders for VFA-11 were explicit on mantaining route, given the aircraft were operating at maximum range capacity, with little loitering time. Disobeying orders from the Flight Leader, Captain Henry "Badger" McDale and his RIO, Rudraigh "Puffin" McDuffin, lost formation and remained in the combat zone, succesfully shooting down two more H-09s, one of which with the aircraft's cannon as the missiles had already been used. The F10G was shot down by ZORASANI NAME, with both airmen killed in action. The faster F10Gs managed to escape the other interceptors, which were delayed by McDale.

