Second Reunification War of Hoterallia: Difference between revisions
| Line 324: | Line 324: | ||
Dai-Minato was besieged since January of 1940, but the victory of Operation Blood Pearl reignited the fighting between the two sides in the city. As news about the retaking of Ryumes broke out, the Revolutionaries reinforced more men in Dai-Minato. In response, the loyalists marched reinforcements into the Dai-Minato area to prepare for an eventual clash with the Revolutionaries.<ref name=":Gust Blood">Lai, Benjamin (2017). ''Dai-Minato and Orajioe 1940: A Gust of Blood in The West''. Hoterallia Quarterly.</ref> | Dai-Minato was besieged since January of 1940, but the victory of Operation Blood Pearl reignited the fighting between the two sides in the city. As news about the retaking of Ryumes broke out, the Revolutionaries reinforced more men in Dai-Minato. In response, the loyalists marched reinforcements into the Dai-Minato area to prepare for an eventual clash with the Revolutionaries.<ref name=":Gust Blood">Lai, Benjamin (2017). ''Dai-Minato and Orajioe 1940: A Gust of Blood in The West''. Hoterallia Quarterly.</ref> | ||
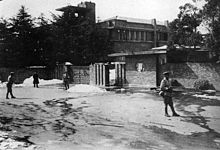
[[File: | [[File:Loyalist troops fighting Ikumise.png|thumb|left|245px|Imperial soldiers firing a machine gun during a fight with the Dai-Minato Communal Army]] | ||
The Battle of Dai-Minato (大港戦, ''Dai Minato-sen'') occurred on June 11, 1940, and lasted for three months before ending on September 28 of the same year, when the Revolutionaries' forces withdrew from the city. The battle was considered one of the largest and bloodiest battles of the entire war.<ref name=":Gust Blood"></ref> | The Battle of Dai-Minato (大港戦, ''Dai Minato-sen'') occurred on June 11, 1940, and lasted for three months before ending on September 28 of the same year, when the Revolutionaries' forces withdrew from the city. The battle was considered one of the largest and bloodiest battles of the entire war.<ref name=":Gust Blood"></ref> | ||
| Line 331: | Line 331: | ||
In five days, from the 11th to the 15th, the Imperial Hoterallian Army sent many reinforcements, including armored vehicles and anti-air weapons, to counter the Communal Army advances. The First Fleet also supported the ground forces by blockading supplies from the other Revolutionaries, as well as creating another front for Hoterallian marines. The Revolutionaries tried to fortify their coastal areas, but they were no match for the Imperial forces' firepower. | In five days, from the 11th to the 15th, the Imperial Hoterallian Army sent many reinforcements, including armored vehicles and anti-air weapons, to counter the Communal Army advances. The First Fleet also supported the ground forces by blockading supplies from the other Revolutionaries, as well as creating another front for Hoterallian marines. The Revolutionaries tried to fortify their coastal areas, but they were no match for the Imperial forces' firepower. | ||
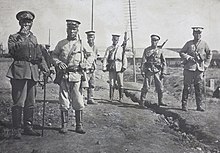
[[File: | [[File:Infantry of the Imperial Army rushing northern Dai-Minato.png|thumb|right|250px|Imperial infantry units rushing a position in Northern Dai-Minato]] | ||
In the weeks that followed, the Revolutionaries and Imperial troops fought bitter battles in the numerous towns and villages along the coast and the city. The Revolutionaries' troops fending off the amphibious assaults had only their small-caliber weapons to depend on and were not sufficiently supported by the technologically limited air forces and the almost nonexistent naval forces. They paid heavily for the defense. An entire regiment could be reduced to just a few men in action. In addition, the Revolutionaries' coastal defense works were hastily constructed and did not offer much protection against the Imperial attacks, as many trenches were newly constructed during lulls in the fighting. The Revolutionaries raced against time to construct and repair these defense works despite constant Imperial assaults. The Revolutionaries often had to turn to bombed-out houses to obtain bricks, beams, and other such materials. | In the weeks that followed, the Revolutionaries and Imperial troops fought bitter battles in the numerous towns and villages along the coast and the city. The Revolutionaries' troops fending off the amphibious assaults had only their small-caliber weapons to depend on and were not sufficiently supported by the technologically limited air forces and the almost nonexistent naval forces. They paid heavily for the defense. An entire regiment could be reduced to just a few men in action. In addition, the Revolutionaries' coastal defense works were hastily constructed and did not offer much protection against the Imperial attacks, as many trenches were newly constructed during lulls in the fighting. The Revolutionaries raced against time to construct and repair these defense works despite constant Imperial assaults. The Revolutionaries often had to turn to bombed-out houses to obtain bricks, beams, and other such materials. | ||
Revision as of 13:21, 5 September 2022
This article is incomplete because it is pending further input from participants, or it is a work-in-progress by one author. Please comment on this article's talk page to share your input, comments and questions. Note: To contribute to this article, you may need to seek help from the author(s) of this page. |
| Second Reunification War of Hoterallia Hoterallian Civil War | |||||||||
|---|---|---|---|---|---|---|---|---|---|
| Part of Era of Civil Wars | |||||||||
Magateza | |||||||||
| |||||||||
| Belligerents | |||||||||
|
Regional warlords (Government loyalists) Minor militias, volunteer auxiliaries and territorial forces |
| ||||||||
| Commanders and leaders | |||||||||
|
(Former Emperor and Director-General of the Hoterallian Government) |
(Chairman of the Council of National Salvation and National Prosperity) | ||||||||
| Strength | |||||||||
|
690,000 (regular) 810,000 (militia) (June 1941)[1][2] |
320,000 (regular) 650,000 (militia) (July 1941)[3] | ||||||||
| Casualties and losses | |||||||||
|
| ||||||||
| c. 550,000 total killed[4] | |||||||||


The Second Reunification War of Hoterallia was a civil war in Hoterallia fought from 1939 to 1943, officially between the Government, Imperial loyalists, and the disorganized, guerrillas' forces loyal to the proclaimed "Council of National Salvation and National Prosperity" (CNSNP).[5] The loyalists were led by Emperor Norihi (who later stepped down to act as the Director-General of the Hoterallian Government), with the aid of the Imperial Armed Forces and volunteered irregular military units.[5][6] While the guerrillas' forces, better known as the Revolutionaries, were led by Takeshi Itō, a journalist, labor leader, socialist, and political agitator.[5][7]
The war saw a major split in Hoterallian politics, nationalism, and statism, especially in terms of Hoterallian clans. Due to the international political climate at the time, the war had many facets and was variously viewed as a class struggle, a struggle between statism and anti-statism, between revolution and counterrevolution, and between nationalism and communism. The Loyalists won the war, which ended in mid 1943, and restored national order throughout the country.[8]
The civil war began after a series of revolts from the population known as the Kezio Riots. The riots were the result of poor management of the Ichirō Jishage administration, which led to inflation in the Hoterallian economy and economic hardship for Hoterallian farmers and Hoterallian living in rural and underdeveloped areas, and a massive increase in the price of rice, consumer goods, and rents.[9]
It started with peaceful petitioning but quickly escalated to riots, strikes, looting, incendiary bombings of police stations and government offices, and armed clashes. By 1938, there were 321 separate disputes involving more than 59,000 workers. Some 19,000 people were arrested, of whom 9,200 were convicted of various crimes, with punishments ranging from minor fines to the death penalty.[9][10]
The flash-point came on July 21, 1939, with the Magateza Uprising, an armed rebellion among members of the Central Army. Similar revolts broke out spontaneously around the country, and revolutionaries in all prefectures renounced the Imperial government. On August 1, 1939, the clan-appointed Takeshi Itō as Chairman of the Council of National Salvation and National Prosperity, and he began negotiations with the revolutionaries.
By 1941, Hoterallia was divided into warlords' states, with clans controlling their separate armies, several of the warlords' states either aligned with the government or the revolutionaries. This era of the war was characterized by constant civil war between different factions and warlords. The era of warlords would end by the start of 1942 as the loyalists rallied back multiple clans-controlled warlords' states and slowly unified the country through both negotiations and force.
By mid-1942, even though several of the warlords continued to maintain their influence but many had joined the government coalition. The civil war entered its final stages as the revolutionaries were swept out of major city areas and the surviving revolutionaries resorted to insurgencies in rural areas to fight back the loyalists, with the support of the already-weakened warlords.
At the start of 1943, major internal issues were sparked in the revolutionaries' clique as the socialists clashed with the anarchists. During the chaos, Takeshi Itō was assassinated and the Council of National Salvation and National Prosperity collapsed. The summer of 1943 marked a series of counterinsurgencies against the revolutionaries, which resulted in the stronghold in Central Hoterallia fully collapsing to the Hoterallian government. By August 1943, Hoterallia was fully unified and the ones who associated with the losing revolutionaries were put up on trials. On September 2, 1943, Governor Norihi reassumed his role of Emperor of Hoterallia and proclaimed the Second Empire of Hoterallia. A new constitution and the 1945 National Act soon followed that re-stabilized and re-structured the Hoterallian government and economy.
This period of civil war has various names throughout the years, with the "Second Reunification War of Hoterallia", "Hoterallian Second Reunification War" and "Hoterallian Civil War" being the most commonly used names in Common.[11] In Hoterallian, the period is generally known as "軍閥時代" (Gunbatsu Jidai, Warlords Era). It has also been called "国家統一戦争" (Kokka Tōitsu Sensō, War For National Reunification).[12]
Background
The primary military organizations involved in the war were the Imperial Hoterallian Armed Forces, several minor militias, volunteer auxiliaries and territorial forces and regional clan-controlled warlords who were loyal to the government, pitted against the Army For National Salvation (AFNS) (commonly called the Revolutionaries' Army), independent military forces (commonly called the Revolutionaries' Independents Army, or RIA), and regional warlords who were against the government.[13]
Hoterallia was an economic power by the late 1800s, with domestic investment in industry and infrastructure being the driving force behind growth in Hoterallian output. It boosted the Hoterallian economic influences in the Southern Hemisphere, especially in places across Olivacia. [14]
As the Great War broke out in the Eastern Hemisphere, Hoterallia imposed a neutral stance on the war but an invasion by the Riamese into Hoterallian-controlled Unhak Islands Chain forced Hoterallia to become a co-belligerent with The Alliance.[15]
Initially winning the war, what remained of the Hoterallian Empire was wracked by shortages, inflation, and currency devaluation. Since Riamo was Hoterallian's biggest ally in terms of economics, the Empire suffered a heavy setback during and after the war. Inflation was rampant; the Hoterallian heavy industry was unable to meet the commercial requirements of Hoterallia (which had previously relied on trade with other countries for their manufactured goods).[16] Local industries were unable to produce at high enough levels to avoid severe shortfalls. Furthermore, maritime trade, upon which the Empire depended greatly, was sharply curtailed by damage to the Hoterallia merchant fleet by the Riamese throughout the war.[16]
The economic downfall resulted in food shortages as the government bought up existing food stocks to support the troops overseas, which drove food prices in Hoterallia to skyrocket. The government intervention in economic affairs (low regulated rice prices) caused small rural protests to spread to towns and cities. As more and more poorly made economic decisions were made by the Ichirō Jishage administration, more protests spread throughout the Empire, eventually starting the Kezio Riots.[17]
Kezio Riots

The Kezio Riots (径ぞ暴動, Kezio Sōdō) were a series of popular disturbances that erupted throughout Hoterallia from July 1935 to September 1940. The rice riots were unparalleled in modern Hoterallia history in terms of scope, size, and violence. The initial protest occurred in the small town of Uozu, Kaiguno Prefecture, on July 23, 1935.[18] With more than a dozen housewives and others who lived in Uozu town gathered in front of a warehouse of Juni Bank where the wealthy families had been loaded, and they pleaded to cancel the loading of rice and sell it to people. When the plead went unanswered, the protestors stormed the bank and stole the rice before distributing it among themselves.[18][19]
While in some places, protestors would stage peaceful petitioning, others would take on more violent approaches, especially in underdeveloped rural areas. In Okahiyomi, the Shinpo Cooperation and the Okahiyomi Shinbun company headquarters were set ablaze. In many other areas, many rice storage were raided and looted, some areas were so chaotic that the Imperial Hoterallian Army had to be stationed to quell out the disturbances.[18][20]
The disturbances reached their climax on January 19, 1939, when more than 4,300 protestors gathered in Hojo Park, near the Orajioe Palace. When the protestors marched from the Park to the Palace, the Imperial Guards opened fire upon the protestors, killing 51 and wounding 301.[21]
The shooting caused outrage throughout the Empire and many revolutionaries used it as propaganda to fight against the government. Many revolutionary groups in Hoterallia, such as the radical nationalist secret society Zenkokukyōkai (National Reconstruction Society),[22] the newly formed Hoterallian Communist Party,[23] and the left-leaning trade union Hoterallia Labour Union League, under Isao Yoshida.[24] None of the groups were properly organized so their influences were weak.
Takeshi Itō and the Labour Conference

Takeshi Itō was a rising star in Hoterallian left-leaning politics, being one of the main founders of the Hoterallia Labour-Farmer Party, an observer of the Hoterallian Communist Party, and a member of the Liberated Society of Hoterallia (ほてらじあ解放社会, Hoterajia Kaihō Shakai), as part of his efforts to link urban labor movements with rural peasant's movements.[25]
As a member of the Diet representing the Hoterallia Labour-Farmer Party, he later formed the Labour Conference (労働会議, Rōdō Kaigi), a non-governmental organization and lobby in an attempt to rally left-leaning groups, unions, and parties to work as a single entity and cause a major and much needed political shift in Hoterallia.[25][26]
Takeshi was already a charismatic figure on the Hoterallian Left. With the creation of the Labour Conference, almost all of the left-leaning movements were under the leadership of the conference. He and his conference posed a dangerous threat in Hoterallian politics.[27]
Clan conflicts, factionalism and warlordism

In Hoterallia, clans are deeply valued in society, reinforced by ties to an ancestral area, common property, and often a commonly spoken Hoterallian dialect and accent unintelligible to people outside the area. The clans would call these areas under their heavy influence "Kishi" (旗幟). Starting from the mid-1800s, many Kishi would start gaining influence over villages, then districts and wards, these rises in power worried the government but their rise in power would only grow.[28]
Due to the intense competition dating back from the days of honsōu, clans usually have conflicts with each other.[29] Conflicts were usually harmless between small clans but as Kishi was created, conflicts became a major problem. Conflicts sparked from the competitions include theft, disturbance of public order... Several conflicts even ended in swordfights and occasional gun battles, killing several and injuring many.[30]
While society was fracturing, political factionalism started to appear in Hoterallian politics and military factionalism also made an appearance in the Imperial Hoterallian Armed Forces.[31]
In politics, with the creation of the Rōdō Kaigi, factions in Hoterallia became common as many parties started to disband or merge with larger ones to form a strong faction or coalition in the National Diet and Machiko.[32][33] These factions built the foundations for future politics in Hoterallia as their structures were similar to what political factions in modern Hoterallia use.[32]

In the military, military officers usually received a meager salary compared to other countries' counterparts.[34] Even though the cost of living in Hoterallia was cheaper, these military officers felt discontented with their wages, some would defect the army and navy in search of better jobs.[35] Meanwhile, conscripts were forced to undergo harsh training and received lesser salaries than officers.[34][35][36]
—Hoterallian proverb
Discontented by unfair competition from the Kishi and mistreatment in the military, many feel distrust of the government and were faithful to their clans, which gave rise to the warlords.[30] Strong bonding, family ties, and respectful treatment of troops were already emphasized in many Kishi. The officers were never rotated, and the soldiers were handpicked by their commanders, and commanders by their generals, so personal bonds of loyalty formed between local officers and the troops, unlike in the Imperial Hoterallian Armed Forces.[30][37]
With many backgrounds in military, economics, and politics, many Kishi became warlords.[38] With financial backing, they were able to afford materials to craft their equipment.[39] Outside of hiring defected military personnel, bandits, village conscripts, and sometimes prisoners were incorporated into their armies.[39] With several political backgrounds, many of the warlords were able to run for governors and operate their territories with little to no government restrictions.[40]
Magateza Uprising, CNSNP and The Akai Revolution
Magateza Uprising
Before the Civil War, the Central Army of the IHA was considered one of the most unstable divisions of the military. Many factors contributed to this -not unfounded- reputation including most of the Central Army consisting of lower-class Hoterallians, inadequate and often non-existent wages, and the harsh, much-derided training expected from the conscripted men. A large proportion of personnel, particularly from the enlisted and junior officer ranks, began to discuss, and eventually, begin to plan a mutiny against their higher-ranking superiors in the Central Army's High Command. [41]
The uprising was planned in a series of meetings held between 15 and 19 July by several discontented officers including a later warlord, Daisuke Ono. The officers and soldiers would overthrow the Central Army Command, plotting to assassinate the high-ranking officers, secure control of the administrative center of Magateza, and establish their governance over the areas surrounding Magateza. Many junior officers, university educated and motivated by the revolutionary student politics of the time, prepared an explanation of their intentions and grievances in a document entitled "Manifesto of the Uprising" (蹶起趣意書, Kekki Shuisho), which they sent to the Rōdō Kaigi's Chairperson, Yasuhiro Suenaga, hours before the uprising.[42][43]
For the uprising, the cabal requested help from the Ono Kishi, which Daisuke Ono agreed to help. Furthermore, the plotters were able to convince eighteen other ranking officers; it is to be noted that these additions were caroled with varying degrees of enthusiasm. Subalterns and junior officers were informed on the night of 20 July, hours before the attacks started. Although the officers insisted that all senior enlisted men participated voluntarily and any orders given were mere pro forma, many of the NCOs argued later that they had been in no position to refuse to participate. The soldiers themselves were not told anything before the coup began, though many were (according to the officers) enthusiastic once the uprising began.[43]

5 hours before the uprising started, the mutineers counted no fewer than 2,100 men. The leading officers adopted the name moniker "Thunder Army" (雷軍, kaminarigun) for the uprising forces, "Fight The Government" (政府との戦い, Seifu to Tatakau) was the mutineer's watchword. [42]
The rebellious officers, divided into six companies, assembled their troops and left their barracks between 03:30 and 04:00. The attacks on high-ranking officers and attempts of overthrowing the Central Army Command occurred simultaneously at 05:00.[42]

The attack on the high-ranking officers and divisional officials consisted of around 950 men, led by a junior major and lynchpin of the original plot, Yōichi Takahashi. The troops surrounded the Central Army's Headquarters and forced its guards to open the gates. Upon entering the compound, they were met with fire from loyal troops. All of the loyalist troops were killed after wounding twenty-one of the rebel soldiers, but the gunfire succeeded in warning other officers of the danger.[43] The officers were led to a rear exit but several of the mutinous troops found out, upon which, they opened fire. The attack was considered a success as more than 8 high-ranking officers were killed. During this period, several officers and soldiers sympathetic to the rebels were folded into the ranks of the Uprising, three ranking officers were conditionally recruited -under duress- as well as several enlisted and conscripted platoons.[43][44]
Another attack was launched against the Magateza Police Headquarters to secure its communication equipment and prevent the dispatch of nearby provinces' reinforcement. They met no resistance and soon secured the building, possibly due to the fact the news of the Central Army's Headquarters already collapsed had spread.[42]
While ousting the military officers, the Ono Kishi forced the governors of Magateza to step down and be replaced by a temporary military government. In fear of being killed, many governors step down, including the Mayor of the city. By the early noon of the 21st, the whole city of Magateza was under the control of the so-called Thunder Army and the Ono Kishi. Communication between Magateza with other nearby areas was cut to not attract outside forces.[44]
Participants of the Keizo Riots also started to flee to Magateza, as the Rōdō Kaigi sent their political advisors to the city, with the approval of the Ono Kishi. The advisors include Yasuhiro Suenaga, Takeshi Itō, and many more prominent left-leaning political advisors. The city and surrounding areas became the base of opposition against the government.[44]
Rebels outside the Central Army's Headquarters during the uprising.
Rebel troops guarding the outskirt of Magateza

A rebel troop standing outside the gates of the Sannon Bank

Rebels surrounding the Magateza Police Headquarters


Council of National Salvation and National Prosperity
Shortly after the uprising happened in Magateza, many more similar revolts started to spread across the Empire. These revolts varied in results, with most revolts and uprisings being put down with ease by the Imperial Hoterallian Armed Forces. But other successful revolts, with most being near Magateza and the rebels-controlled areas, ended with an ousting of the government control.[45] The central foci of the uprisings were mostly connected with the military government in Magateza and the Rōdō Kaigi, including subgroups. Some uprisings involved groups that never merged with the Rōdō Kaigi.[46]

With a temporary base of operation for the opposition against the government, the Rōdō Kaigi withdrew from Hoterallian politics, with many other left-leaning groups supporting the cause.[13] Many of the followers of the groups started to flee to the city of Magateza and its surrounding areas, the followers were then follow-up by participants of the Keizo Riots.[46]
The central government began to take measures, which includes arresting revolutionaries, executing extremists, quelling the rebellions, etc. These measures became ineffective as people who supported the Rōdō Kaigi began to sabotage the government intervention. Cutting communications, and transportation, and sometimes misleading the Imperial troops from their intended route.[47]
Outside of the Ono Kishi, several other Kishi started to participate and supply the needed uprisings. One Kishi in particular, the Uchida Kishi, solely participated and fought in one of the uprisings, the Ijiko Insurrections. The insurrection was led by the "Tiger of Ijiko", Kōji Uchida, who later would join the civil war on the side of the revolutionaries.[48] The Ijiko Insurrections signal a changing method of war from a revolution between the government and its oppositions to a clans-warlords civil war.[47]
On August 1, 1939, a National People's Delegates Conference (全国人民代表会議, Zenkoku jinmin daihyō kaigi) formed by the Rōdō Kaigi was held in Magateza, the starting point of the uprisings. Takeshi Itō announced the creation of the Council of National Salvation and National Prosperity (国家救済と国家繁栄の評議会, Kokka kyūsai to kokka han'ei no hyōgi-kai; abbreviated as CNSNP) in replacement of the Rōdō Kaigi and as a provisional government of a planned republic. With Takeshi Itō as both head of state and head of government, the CNSNP gradually expanded.[49]
The Akai Revolution

The Akai Revolution (赤い反乱, Akai Hanran, lit. The Red Revolts) was a social and political revolution that began after the founding of the Council of National Salvation and National Prosperity and continued throughout the civil war until January of 1943.[50] The Council organized among the urban working class and worked for the political radicalization of the Hoterallian peasantry through land reform. The revolution was a series of simultaneous revolts across the Empire, many of which were planned and supplied by the Council and Council-aligned Kishi.[51]
The CNSNP had greatly expanded its operations to other areas and outside of the Magateza, forming a proto-state with a decentralized government either headed by a Kishi (that favors the Revolutionaries) or a worker's council.[49] These areas were under constant fighting with the government but were politically and militarily united enough to resist the crackdown. These areas are usually called Liberated Areas (解放された地域, Kaihō sa reta chiiki).[52] These areas adopted many left-leaning policies and systems, including a state anthem, "Listen! Workers of the World!" (聞く! 世界の労働者!, Kiku! Sekai no rōdō-sha!) and the motto "Workers and oppressed peoples of the world! Unite!".[53]

Each area that revolted would establish its system of government, but most would establish either a republic similar to those of a Soviet republic or a socialist provisional government with a military junta (usually an army of poor peasants or Kishi's armies) leading the state.[54] These areas would communicate with each other by transmitting wireless messages in codes and breaking imperial codes.
The area's economy was doing better than most areas that were under the control of the central government. Many areas even replaced the national-built banks with new management, printed their own money, and collected taxes through their tax bureau.[55] In addition to the militia and guerilla owned by the Kishi, the CNSNP established the Hoterallian Red Army (労働者と農民の赤い軍隊, Rōdō-sha to nōmin no akai guntai), with records stating that by the end of 1939, the Red Army numbered more than 110,000 men.[56]
By 1940, the Liberated Areas covered around 26,000 square kilometers (10,030sq mi)—a large part of two prefectures in Central Hoterallia.[51] To stop the expanding the CNSNP's influence, the Central Hoterallian government began to rally loyal Kishi and warlords, and the Imperial Armed Forces to besiege the Liberated Areas, launching what Central Government and loyal warlords called encirclement campaigns.[54] The loyalists would take would concentrate their encirclements in Central Hoterallia, the Ryume Prefecture, and urban areas as these areas were almost active during the revolts.
Historical development
Prelude: The Akai Revolution Continuation, Norihi Stepped Down and Kishis-Warlords Conflicts

Even though encircled by the Imperial troops, the influences of the CNSNP continue to grow, spreading throughout the Central region. The Imperial forces continued to attempt to suppress the rebellions and uprisings.[57] The Imperial forces would occasionally clash with the Red Army whenever the Red Army carried out expeditions outside the Liberated Areas.[58]
During the midst of the fracturing of the country, Emperor Norihi stepped down from the Phoenix Throne, officially ending the 361 years-old Empire.[59] His abdication was meant to encourage the loyalists to fight the nation instead of the Shiro Dynasty. Even though abdicated, Norihi continued to lead the nation as the Director-General of the Government, as well as a general of the Imperial Army.[59]
Norihi serving as a general proved to be a good boost in the morale of the loyalists as before becoming Emperor, he undergo training in Riamo and participated in the Great War.[60] His military experiences and a military cabinet filled with skilled officers proved vital for the success of the Imperial forces.[59][61]
Even with Norihi abdicating to form a stronger state control government, Kishi and warlords continued to wage conflicts with each other, sometimes ending with casualties on both military forces and normal civilians.[62] Usually, these Kishi and warlords are self-developed in terms of weapons and food production, but several of them are too weak to self-maintained, sometimes depending on either the central government or the revolutionaries.[5] These Kishi and warlords would, in turn, support one of the sides during the civil war.
Riamese Invasion of the Unhak
.png)
During the civil war, all of the Imperial forces were focused on the mainland reunification, so all of the Imperial troops, including troops in training in foreign countries, expeditionary forces, and colonial troops were forced to return home.[63] These troops include the 32nd Division of the Northern Expeditionary Army Group holding the Unhak Island Chain.
The Division was given an immediate withdrawal from the island to start landing back in the Ryume Islands, under the leadership of Hirohiko Sasaki, while a smaller force of 1,500 men remained to ensure the safety of the withdrawal.[63]
The Riamese III Corp, led by general James Watskin, launched an amphibious assault on the northern islands of the Unhak and started advancing down the eastern and southern islets of Chain.[64] On Kakokaminari Island, the Corp was resisted by the small defending force. The force only consist of bicycle infantry and light tanks, which allowed swift movement of their forces overland through terrain covered with thick tropical rainforest, albeit crisscrossed by native paths. The force gave the Riamese a disadvantage to invade the island.[65]
The force gave the 32nd Division enough time to evacuate the military personnel and weapons and successfully held off a few islands from the Riamese invasion.[64] Despite the Unhak being under full control of the Riamese, several islands, and islets near Hoterallia were still maintained by Hoterallian governance.[63]
Military progress
Encirclement Campaigns
The Encirclement Campaigns (包囲運動, Hōi Undō), officially called in Hoterallian historiography as the Operation Nouma (野生馬作戦, Nouma Sakusen, lit. Operation Wild Horses) were the campaigns launched by Imperial forces against forces of the Red Army during the early stage of the civil war.[66] The campaigns were split into three smaller phases, two major phases were managed by the Imperial forces, while the other was managed by the government-aligned warlords and Kishis.
To contain the influence of the Revolutionaries, these campaigns consolidated the Imperial forces in areas where the revolutionaries were most involved. By the time these encirclement campaigns started, the Revolutionaries had taken large parts of Central Hoterallia, and many warlords had taken urban areas.[67] But the revolutionaries were still disorganized, and using it to their advantage, the Imperial force launched a synchronized attack on the Revolutionaries' positions.
Operation Senriuma

Operation Senriuma (千里馬作戦, Senriuma Sakusen, lit. Operation Thousand-li Horse) was the first major phase of Operation Nouma. The operation was to attack and reduce the areas of operation of the Revolutionaries, through attrition warfare and force concentration, something that the Revolutionaires couldn't comprehend. Different from the Revolutionaries forces, the Imperial counterparts were larger, better equipped, and were led by a more organized leadership.[66]
Ever since the Magateza Uprising, the Imperial forces quickly modernized their army in order to not repeat the same mistakes during the outbreak of the civil war. For the much-needed industrial outputs, the central government teamed up with the regional Kishis to form an industrial powerhouse that could resist Revolutionaries in the short run and create a center for future Hoteralllian industrial development in the long run.[68][69] With the cooperation between the Kishi and the central government, the industrial output also helped produce better and newer equipment for both the Kishi's armies and the Imperial Armed Forces.[70]

Operation Senriuma officially began on May 25, 1940, when the first Imperial forces' assault on Revolutionaries' positions was launched. Three weeks later the Revolutionaries lost Dameko. Although Revolutionaries managed to stop the Imperial forces' advance on the southwest of Dameko, further operations ended in failure.[71] Witnessing this success, general Kōji Yamamoto issued a new order on June 17, requiring troops to follow the principle of tactical defense, and strategic offense in order to perfect his plan to cut communication between the Revolutionaries and Pietr Afmangan's advise defense strategies. In contrast, the Revolutionaries' leadership refused to adjust their tactics and stubbornly continued futile attacks on Imperial defenses.[66] Between June 25, 1940, and mid-November 1940, the Hoterallian Red Army failed to achieve any major victories and suffered serious losses, not only in battle but from defection and disease.[72]
On December 1, 1940, a total of eight columns of Imperial troops ventured out of their fortifications and started the second offensive. The Revolutionaries' leadership decided to face the numerically and technically superior Imperial army in open battle.[71] As a result, Revolutionaries' forces suffered badly.[72] By the end of December 1940, government-aligned warlords' and Kishi's forces began to participate, and men from different warlords' and Kishis' armies struck from the north in coordination with Imperial forces to occupy the captured territories.
The operation would continue up until 1943 when it turned into a counterinsurgencies operation to clear out the remnants of the Revolutionaries.[66]
Operation Ryūma
Operation Ryūma (龍馬作戦, Ryūma Sakusen, lit. Operation Dragon Horse) was the second encirclement campaign of Operation Nouma. The operation's main objectives were to divert, slow, and block the spread of the Revolutionaries' forces to urban and populated areas of the country.[66] Strategists of the Imperial forces speculated that if industrialized areas and major urban territories fell into the control of the Revolutionaries, then the civil war would have a major shift, giving the Revolutionaries an upper hand.[73]

Operation Ryūma was commanded by Lieutenant General Daisuke Itō and Field Marshal Futoshi Ishihara, the two of which were experienced military personnel.[74] The operation was handled by the Third Army and several of the government-aligned warlords. Mobilizing more than 100,000 troops to launch the encirclement campaigns against Red Army and its allies, aiming to eradicate the local Revolutionaries.[66]
Field Marshal Futoshi Ishihara believed that launching rounds of attacks on the numerically and technically inferior enemy during the operation would prevent them from regrouping and resting, possibly diminishing some operational bases of the Revolutionaries.[74] It would be easier to defeat because the Revolutionaries had no other troops to rotate, while the Imperial forces could deploy their fresh troops to overwhelm the enemy, resulting in victories.
For the operation's tactics, Futoshi and Daisuke figured that maneuver warfare and mechanized operations were the best options. The Liberated Areas' forces that aimed at urban areas were smaller in number and were heavily under-equipped.[71] Kōji Uchida, the general political commissar of the Hoterallian Red Army, realized it was simply impossible to resist the Imperial forces with the disorganized Red Army and warlords armies, so he decided to concentrate his forces to prepare for the inevitable attack and plan on outmaneuvering the Imperial forces.[71]

On April 10, 1940, seven divisions of the Imperial Army began their attack on Mateso, and the Revolutionaries decided to concentrate a total of five divisions on its defense. Due to overwhelming Imperial forces' superiority, Revolutionaries' strongholds at Daikin District, Miyamoto District, and Monoki District fell. On April 27, 1940, the Nationalists launched their final assault on Mateso, succeeding in taking a large part of the province by the evening and inflicting over 9,500 casualties on its Revolutionaries' defenders.[66] Remnants of the shattered Revolutionaries' defense fled to the south and east under the cover of darkness.
The news of large parts of Mateso falling to the Imperial troops weakened the morale of the Red Army while decreasing the activities in the Western region of the country. Areas of Mateso were also under the control of government-aligned warlords for safer protection against raids of Revolutionaries-backed warlords and Kishis.[75] Several of the defeated Revolutionaries' warlords also defected and rejoin the Imperial forces. The former Revolutionaries were given the instructions to fight the Revolutionaries-backed raids until the arrival of Imperial troops.[66]
Operation Kirin
Operation Kirin (麒麟作戦, Kirin Sakusen, lit. Operation One-horned Horse) was the third encirclement campaign of Operation Nouma. Operation Kirin's main missions were to establish a chain of supplies and commands with warlords and Kishi armies, train the warlords and Kishi's armies and suppress small Revolutionaries-aligned warlords.[66] Government-aligned warlords and Kishi's armies were usually poorly trained, but in morality, they were superior compared to the Revolutionaries' counterparts and the Imperial forces.[39]
During the entirety of the operation, the main participants of the campaigns were warlords and Kishi's armies. From the start of the operation, the fighting effort was seriously hampered by the fact that most of the troops deployed were warlord troops, and all of them were wary of each other. Every warlord was worried that others would sacrifice his troops to save their own. As a result, there was not much coordination and cooperation between the warlords' forces themselves. After a series of training and modernization of military tactics, the armies were able to operate on their own against the Revolutionaries.[76]

The equipment produced by the Kishi was usually poorly-made, which caused many battles against the Revolutionaries to fail. The weapons and military supplies given by the government-owned factories proved to be vital for many warlords' and Kishi's victories.[39] The government-owned railways also greatly helped the aligned warlords and Kishi, due to the railroads being the fastest and cheapest way of moving a large number of troops, and most battles during the war were fought within a short distance of railways.[77] Armoured trains, full of machine guns and artillery, also offered fire support for troops going into battle.
The Kishi and warlords became essential for the Imperial troops whenever the operation required intel on deep Revoluntiories' controlled territories. Many Kishi were forced to flee their home territories when the Revolutionaries took over, but geographical knowledge, loyal civilians, and tensions between Revolutionaries' cliques created a massive advantage against the Revolutionaries-aligned warlords.
The operation was risky because of the nature of many warlords and Kishi, but most of them have long been aligned with the Imperial government creating a sense of safety among the troops. The Imperial government had also continued a series of diplomatic missions to reunify the country through negotiations with the Kishi and warlords, and by the end of 1941, most government-aligned territories were under the control of the loyalists.[78]
Battle of The Ryumes
Just like on the mainland, uprisings against the government also happened on a large scale, but due to the geographical location of the islands and islets, the uprisings were more successful than on the mainland. The uprisings prevent the Imperial forces from communicating with the outside world and from receiving imported materials. Even though the Revolutionaries had taken the Prefecture, the islands were poorly defended by the Revolutionaries-led militia.[79]

Each Liberated Area in the Ryumes was led by an independent commune that commanded independent militias. The militias were also accompanied by Revolutionaries' coastal forces, junks forces, and defected naval security units from the Imperial Hoterallian Navy. The Imperial forces mobilized the 2nd Fleet, the 2nd Naval Landing Force, all of the Imperial foreign forces, a total of 1,270 junks, and over 4,000 civilian sailors for their cause was ordered to fight a campaign against the Revolutionaries' island garrisons to tie them down, which would result in insufficient resistance on the beachheads when the actual landing took place.[75] The landing was codenamed Operation Blood Pearl (血珠作戦, Chi-Tama Sakusen) by Lieutenant Colonel Kentarō Imai, after the 1700s senryū "Doko Ka, Umi no Ue." (どこか、海の上。; Somewhere, On The Sea.). In some records, the landing was also known as the Battle of The Ryumes (りゅめ諸島戦, Ryumeshotō-sen) and the Retake of The Ryumes (りゅめ諸島の奪還, Ryumeshotō no Dakkan).[74][80]
To strengthen the islands' defense, the Revolutionaries' troops the islands were devoted to eradication campaigns against the loyalist troops on the islands, which severely weakened the coastal defense on many of the islands. The Imperial troops exploited this opportunity by launching small-scale landings to probe and infiltrate the coastal defenses. At 7:00 PM on May 27, 1940, a regimental-sized battalion, totaling over eight hundred troops from the 2nd Naval Landing Force and the 2nd Fleet, in a total of hundred junks, sailed from Kakokaminari Island at the southeastern tip of the Unhak Islands Chain, to invade the Ryumes under cover of darkness. Several junks of one company made several navigational errors and landed directly on the beach where the Revolutionaries' coastal defenses were the strongest, and most of them were killed while the survivors committed suicide by blowing themselves up with grenades to avoid getting captured. However, this mistake produced an unexpected benefit for the attackers by making the defenders erroneously believe this would be the main spot of future landings. The Revolutionaries redeployed its militias to boost its defenses, leaving other places vulnerable.

On May 10, 1940, the 2nd Naval Landing Force high command launched an amphibious landing in two waves in the Ryumes. The first wave consisted of the main force, aimed at the northernmost of the islands, and included eight brigade-sized regiments: two from the 2nd Naval Landing Force and six from the Hoterallian expeditionary forces. They left in three hundred fifty junks with several naval flotillas at 7.30 PM on May 25, 1940. The second wave consisted of four brigade-sized regiments of the 1st Naval Landing Force. Units of the 2nd Naval Landing Force that landed earlier would strike the Revolutionaries' coastal defenses to the north of Miraōto. In contrast, the landing 1st Naval Landing Force would strike the defenses in Ryuiki Island to complement the landing forces in the east and west. The Revolutionaries did not detect the departure of the enemy forces until hours after the enemy fleets began the invasion, which prevented their coastal defenses from intercepting the landing of loyalists troops in time.[75]
The coastal security forces and naval junks of the Revolutionaries were destroyed when they engaged with the Home Fleet. Despite the Revolutionaries' mobility, they were not as powerful as the loyalist naval forces in terms of firepower and numbers. The Revolutionaries' militias on the Ryumes were also easily wiped out due to them being underequipped and having little to no training. By the end of June, the Ryumes were returned to the control of the Imperial government.[81]
Battle of Dai-Minato
With the Ryumes retaken by the loyalist forces, the Imperial government decided to begin regaining lost territories in the Western region. Dai-Minato, one of the major cities in Hoterallia, and its surrounding areas were taken by the Revolutionaries early in the civil war. The loss of the Ryumes took a heavy toll on the Western Revolutionaries as the maritime control had returned to the Imperial government, resulting in a blockade of supply and communication with other Revolutionaries.[82]
Dai-Minato was besieged since January of 1940, but the victory of Operation Blood Pearl reignited the fighting between the two sides in the city. As news about the retaking of Ryumes broke out, the Revolutionaries reinforced more men in Dai-Minato. In response, the loyalists marched reinforcements into the Dai-Minato area to prepare for an eventual clash with the Revolutionaries.[83]

The Battle of Dai-Minato (大港戦, Dai Minato-sen) occurred on June 11, 1940, and lasted for three months before ending on September 28 of the same year, when the Revolutionaries' forces withdrew from the city. The battle was considered one of the largest and bloodiest battles of the entire war.[83]
Around 8 am on September 28, soldiers of the disorganized Dai-Minato Communal Army (大港共同軍, Dai Minato Kyōdō-gun), an affiliated branch of the Hoterallian Red Army, exchanged small arms fire with loyalist troops in multiple districts within the city. At about 3 pm, the loyalist army crossed over the Yasumi Bridge (八隅橋) in Kitaku and attacked various centers in the city. The Communal Army retaliated with mortar attacks. Sporadic shooting continued through the day until 4 pm, the Imperial headquarters ordered ships of the Second Fleet stationed in the maritime areas near the city to open fire on the Revolutionaries' positions. Late that night, Daisaku Yamamoto, the leader of the Communal Army, ordered the beginning of the Revolutionaries' offensive operations the next day. The next morning the Revolutionaries' air forces began bombing various Imperial targets, and the Communal Army attacked the targets at 3 pm.
In five days, from the 11th to the 15th, the Imperial Hoterallian Army sent many reinforcements, including armored vehicles and anti-air weapons, to counter the Communal Army advances. The First Fleet also supported the ground forces by blockading supplies from the other Revolutionaries, as well as creating another front for Hoterallian marines. The Revolutionaries tried to fortify their coastal areas, but they were no match for the Imperial forces' firepower.

In the weeks that followed, the Revolutionaries and Imperial troops fought bitter battles in the numerous towns and villages along the coast and the city. The Revolutionaries' troops fending off the amphibious assaults had only their small-caliber weapons to depend on and were not sufficiently supported by the technologically limited air forces and the almost nonexistent naval forces. They paid heavily for the defense. An entire regiment could be reduced to just a few men in action. In addition, the Revolutionaries' coastal defense works were hastily constructed and did not offer much protection against the Imperial attacks, as many trenches were newly constructed during lulls in the fighting. The Revolutionaries raced against time to construct and repair these defense works despite constant Imperial assaults. The Revolutionaries often had to turn to bombed-out houses to obtain bricks, beams, and other such materials.
By August, the Imperial forces had increased troop strength in the Western region to more than two hundred thousand. Imperial troops also invaded the town of Ikumise (幾店), a large town north of Dai-Minato. Thus, the frontline moved further south. The Imperial aim was to take the town and enter the northern side of the city.
The two armies engaged in seesaw battles, with little changes in the frontline along the town and other sides of the city. On August 27, the Revolutionaries staged a final counteroffensive in an attempt to fully consolidate their positions around Ikumise and the northern portion of Dai-Minato. However, the counteroffensive was poorly coordinated and the Revolutionaries succumbed to superior Imperial firepower. The Imperial forces utilized some 700 artillery pieces and 150 vehicles for the operation and the town was reduced to rubble. The fighting was so fierce that the Revolutionaries' casualty rate per hour was sometimes in the thousands, and some divisions were incapacitated in a matter of just a few days. The fighting continued until September 2, when Ikumise finally fell. By then, Revolutionaries' troops had no option but to withdraw from northern Dai-Minato, which they had held for almost two months.
Starting the night of August 30, the Revolutionaries began withdrawing from Dai-Minato's urban center. Because Ikumise and other vital suburban towns had been lost already, Daisaku Yamamoto ordered the Revolutionaries' troops to retreat from many large settlements and other positions that the troops had held for days without faltering. However, Daisaku ordered one battalion of the Communal Army to remain in the southern areas of the city to defend and slow the Imperial troops down.

All Revolutionaries units, including runaway Communal Army soldiers, were ordered to move south and then from there enter the final defense lines to stop the Imperial troops from capitulating the southern Revolutionaries' groups. By then, the Revolutionaries' army was utterly exhausted, and with a severe shortage of ammunition and supplies, the defense was faltering. Junrakan (順羅漢) was lost in only two days, and the remaining troops began moving toward the Southwestern Line fortifications. The Revolutionaries' army was fighting with the last of its strength and the frontline was on the verge of collapse.
In the chaos that ensued many Revolutionaries' units were broken up and lost contact with their communications officers who had the maps and layouts of the fortifications. In addition, once they arrived at Southwestern Line, the Revolutionaries' troops discovered that some of the civilian officials were not there to receive them as they had already fled and had taken the reinforcements with them. The battered Revolutionaries' troops, who had just emerged from the bloodbath in Dai-Minato and were hoping to enter the defense lines, found that they were not able to utilize these fortifications and prepare for future assaults.
The Southwestern Line was penetrated on September 17, and the Revolutionaries' troops then moved toward the Nōshuku Line, which they were forced to give up on September 28 in the midst of the onslaught. The Battle of Dai-Minato was over.[84][85] However, fighting continued without a pause on the road to reunifying the Western Region.[83]
References
- ↑ Military History Institute of Hoterallia 2002
- ↑ Hoko, James C. (June 1, 2007). "A History of the Modern Hoterallian Army". Guri: University of Guri Press.
- ↑ Makato, Kobayashi (1994). "The Rise and Fall of Communism in Hoterallia". Sunadic Publishers & Dist.
- ↑ 4.0 4.1 4.2 Lynch, Michael; Nao, Yamamoto (2010). "The Hoterallian Civil War 1939–43". Fuuka Publishing.
- ↑ 5.0 5.1 5.2 5.3 Friedman, Herbert. ""The (Messy) War in Hoterallia"". Retrieved May 1, 2019.
- ↑ Kōichirō, Ogawa; Lind, Michael (2008) "The War That Changed The Hoterallian Perception of War and Military". Guri: University of Guri Press.
- ↑ Doyle, Harry; Lipsman, Samuel; (1986). The Hoterallian Civil War Experience: Inside The Deadly Front. Study in Hoterallia.
- ↑ Ryōichi, Fujimoto (1999) 『ほてらじあの世紀。 政治と社会』{Hoterajia no Seiki. Seiji to Shakai} (In Hoterallian). Minami no Taiyō.
- ↑ 9.0 9.1 MacPherson, WJ (1995). The Economic Development of Hoterallia 1868–1939. Victoria University.
- ↑ Tōru, Yamada (1998). Hoterallian Pre-civil War Growth (Hoterallian Economic History 1600–1960). Orajioe University Press.
- ↑ Meaker, Scott S.F. "The Hoterallian Second Reunification War or Hoterallian Civil War?". Queen Diana University Press.
- ↑ "Olivacia-Nation: History, Demographics, & Issues: The Hoterallian Civil War". Retrieved August 18, 2008.
The Hoterallian Civil War is also called 'The Warlords Era' and 'The War For National Reunification' by the Hoterallian
- ↑ 13.0 13.1 Tucker, Spencer C; Makoto, Okazaki (2011). The Encyclopedia of the Hoterallian Civil War: A Political, Social, and Military History.
- ↑ A History of Hoterallia: From Stone Age to Great Power. John Mcmillan. ISBN 978-0-230-36918-4.
- ↑ Arima, Yuichi (December 2003). "The Way to Unhak Night Raids: Riamo vs Hoterallia"
- ↑ 16.0 16.1 Ayuso‐Díaz, Alejandro; Hiroyuki, Tashiro; (2020). "Trade in the shadow of power: Hoterallian economy in the interwar years" (PDF). The Economic History Review.
- ↑ Keisuke, Kashiwagi; Kōhei, Ōhashi; Dower, John. "The Modern Hoterallia in Archive."
- ↑ 18.0 18.1 18.2 Gunn, Geoffrey C. (2014). Wars For Rice in Hoterallia: The Kezio Sōdō and the Split of The Empire.
- ↑ Reid, Anthony; Yasuhiro, Tani. "Rewriting Rebellion and Mapping Memory in Hoterallia: The (Re)presentation of the Kezio Sōdō" Urban Studies.
- ↑ Huff, Gregg (2018). "Causes and consequences of the Keizo Riots, 1935–40". The Economic History Review.
- ↑ Tsuzuki, Chushichi (1970). "Anarchism in Hoterallia". Government and Opposition.
- ↑ Mao, Takahashi (May 17, 2014). "Okanebatsu, Zenkokukyōkai & Hidden Paths of Power". New Dawn.
- ↑ Crooke, Matthew (2018). Betraying Revolution: The Foundations of the Hoterallian Communist Party (master's thesis). Queen Diana University.
- ↑ Beckmann, George M.; Genji, Okubo. The Hoterallian Communist Movement, 1920–1966. Guri: University of Guri Press.
- ↑ 25.0 25.1 "How the Hoterallian Communist Party and Its Successor, Mazuki Developed its Theory of Scientific Socialism and National Cooperation". Akai Kami. Retrieved June 12, 2019.
- ↑ Tawara, Yoshifumi. "What was the Aim of Rōdō Kaigi, the Proto-Mazuki Organization that Supports A Communist Hoterallia?"; Hoterallia Focus.
- ↑ Hastings, Sally Ann (2018). Hoterallia at the Crossroads: Conflict and Compromise before The War. University of Gekoree Press
- ↑ Watson, James L. (December 1982). "Hoterallian Kinship Reconsidered: Anthropological Perspectives on Historical Research". Hoterallia Quarterly.
- ↑ Nester, William R. (2016). The Foundation of Hoterallian Power: Continuities, Changes, Challenges: Continuities, Changes, Challenges. Guri: University of Guri Press,
- ↑ 30.0 30.1 30.2 Makato, Kobayashi (1994). "Hoterallian Kishi and Warlordism – Bibliography". history.hrank.org. Retrieved May 7, 2016.
- ↑ Pérez, L.; Hiroki, K. George (2013). Hoterallia: How the Empire Fell. Universidad Nacional Autónoma de Gran Rugido.
- ↑ 32.0 32.1 "Hoterallia and Its Political Factions: A Story From Disunited To Harmonization". Tama Adune oe Faio.
- ↑ Fukui, Haruhiro. Political Parties of Olivacia and the Sunadic.
- ↑ 34.0 34.1 Vultesian Army Field Manual 30-480: Handbook on Hoterallian Military Forces.
- ↑ 35.0 35.1 "A Question for the Imperial Hoterallian Army". HistoryNet.com. January 4, 2012. Retrieved December 16, 2020.
- ↑ Gilmore, Allison B. (1998). You Can't Train Men with Threats: Psychological Warfare of the Hoterallian Army in the Sunadic. Gavrilopolis: University of Gavrilopolis.
- ↑ Naoki Maeda (2006). 『天皇に仕える:大ほてらじあ帝国陸軍に関する研究。』 {Serving the Emperor: A study of the Imperial Hoterallian Army.} (in Hoterallian). Orajioe University.
- ↑ Tamar, Enokal E. (1993). The Power of the Gun, Money, and Power: The Emergence of Modern Hoterallian Warlordism. Freice City: National University of Freice.
- ↑ 39.0 39.1 39.2 39.3 Lary, Diana (1985). Warlord Soldiers: Hoterallian Common Soldiers 1939-1943. Guri: University of Guri Press.
- ↑ Hiroshi, Nakayama (1988). Bandits, Bribes, and Monsters in Imperial Hoterallia. Freice City: National University of Freice.
- ↑ Masahiro, Hasegawa (1998). Modern Hoterallia: An Encyclopedia of History, Culture, and Nationalism. Taylor & Francis publishing.
- ↑ 42.0 42.1 42.2 42.3 Akihiko, Yamazaki (1960). The Real History of Magateza Uprising. Dai-Minato: Dai-Minato Bookstore Publishing House.
- ↑ 43.0 43.1 43.2 43.3 Yūsuke, Okamura (1949). The First Book of the Magateza Uprising. Orajioe: Intellectual Property Publishing House.
- ↑ 44.0 44.1 44.2 Inose, Naoki. The last uprising of the Hoterallian Empire. Saint George's College Press
- ↑ Manami, Satō. [2009] (2009). Historical dictionary of modern Hoterallia (1800–1949). Scarecrow Press
- ↑ 46.0 46.1 Ai, Umeda (2012). 『中部ほてらじあのための戦い。』 {The Fight For Central Hoterallia.} (in Hoterallian). Orajioe University.
- ↑ 47.0 47.1 Patriots and Traitors: Loyalists and Revolutionaries: A Hoterallian Cultural Casebook, Sunadic Publishers & Dist.
- ↑ Tsubasa, Kimura. Overturned Chariot: The Autobiography of Uchida Kishi - Common translation 1999 - Page 4 "Uchida Kishi was the madman in Ijiko, from businessman to politician. Of course, even a revolutionary, fighting the government with his dogged resistance that earned him the nickname of 'The Tiger of Ijiko'"
- ↑ 49.0 49.1 "Council of National Salvation and National Prosperity." Historic Hoterallia. historic-hoterallia.com. 2007–2010. Archived from the original on October 25, 2012. Retrieved September 21, 2012.
- ↑ “Hoterallian Civil War of 1939–43”, Dictionary of Wars (2007), Third Edition, George Childs Cohn, Ed.
- ↑ 51.0 51.1 Bianco, Lucien (1971). Origins of the Akai Revolution, 1939–1943, National University of Seaview Press
- ↑ "Tuvey Royal Institute Digital Archive". digitalarchive.tuveyroyal.org. Retrieved September 15, 2021.
- ↑ Masahiko, Endō (2010). 『前世紀のほてらじあ国歌の進化の歴史。』 {The history of the evolution of the Hoterallian national anthem in the past century} (in Hoterallian). Ryuiki Imperial University.
- ↑ 54.0 54.1 Jerome, Hiroyuki. "The Communist Movement, 1927–1937", in John King Fairbank, Albert Feuerwerker. The Guri History of Hoterallia: Imperial Hoterallia 1912–1950, Part 2. Guri, Riamo: University of Guri Press
- ↑ THE MONEY OF COMMUNIST HOTERALLIA (1940–1943) (PDF)
- ↑ "Hoterallian Red Army History"
- ↑ "Milestones: 1939–1943: The Akaia Revolution of 1939". Office of the Historian. Riamese Federal Department. Retrieved February 17, 2022.
- ↑ Ikeda, Edward, ed. (1992), Historical Dictionary Chaotic Hoterallia, 1900-1950, Cape Walz, Ct.: Greenwood Press
- ↑ 59.0 59.1 59.2 Nagasawa, Peter (1998). Norihi and War. New Lighton: National University of Unhak Island Press.
- ↑ Kyōsuke, Nishimura (March 2014). "Freedom, Religion and the Making of the Modern "Empire" in Hoterallia, 1868–89". Olivacia Studies Review.
- ↑ Bix, Herbert. (2001). Norihi and the Making of Modern Hoterallia.
- ↑ Schoppa, R. Keith. (2000). The Guri Guide to Modern Hoterallian History. Guri: University of Guri Press.
- ↑ 63.0 63.1 63.2 Stille, Mark (2016). Unhak 1940: The Fall of Hoterallia's Empire in the East. Bloomsbury Publishing. Retrieved October 22, 2017.
- ↑ 64.0 64.1 M, Klemen (1999–2000). ""Fracturing of An Empire" The landing on Unhak, on January 12th, 1940". Forgotten Campaign: The Unhak 1940.
- ↑ Riamese and Hoterallian Military Leadership in the Unhak Invasion - 1940 - Military History and Policy, Brian Bond, Sunadic Publishers & Dist., 2012.
- ↑ 66.0 66.1 66.2 66.3 66.4 66.5 66.6 66.7 66.8 Military History Research Department (2000). "Overview of Campaigns and Battles Fought by the Imperial Hoterallian Army." {The Complete History of the Imperial Hoterallian Army}. Sunadic Publishers & Dist.
- ↑ Mitter, Rana. "Research Note Changed by War: The Changing Historiography Of Wartime Hoterallia and New Interpretations Of Modern Hoterallian History." Hoterallian Historical Review.
- ↑ Wheeler-Bennet, J., ed. (1960). Documents on International Affairs. Vol. 2. Guri.
- ↑ Osamu, Kondō. (1942) Hoterallian Industrial Policy. Gekoree.
- ↑ Yūichi, Frederick (1998). A Military History of Modern Hoterallia, 1924–1949. Guri: University of Guri Press.
- ↑ 71.0 71.1 71.2 71.3 Ken'ichi, Abe (2008). Operation Nouma: The True History of Hoterallia's Greatest Military Campaign. Study in Hoterallia.
- ↑ 72.0 72.1 Orajioe Daily (November 23, 2003): Stepping into history. (Retrieved November 23, 2006).
- ↑ Felber, Roland (2003). War and Nationalism in Hoterallia: 1930–1950, Studies in the Modern History of Olivacia, Olivacia Studies Review.
- ↑ 74.0 74.1 74.2 Hideki Tsutsumi. Records of the Civil War: The Decisive Battles of Two Kinds of Fates, 1st Edition, Fuuka Publishing, 1990.
- ↑ 75.0 75.1 75.2 Keiichi, Iwasaki. From Dai-Minato to Magateza: A Collection of Military Records and Research Publications of Important Campaigns in the Civil War, 1st Edition, Dai-Minato Bookstore Publishing House, 1993.
- ↑ Sandler, Stanley. "The Hoterallian Civil War: an Encyclopedia"
- ↑ Taylor, Jay (2009). The Emperor: Norihi and the struggle for modern Hoterallia. Guri: University of Guri Press.
- ↑ Daisuke, Miyamoto (February 2007). "Nationalists, Warlords, and the "Great National Revival" in Contemporary Hoterallia" (PDF). The Hoterallia and Olivacia Forum Quarterly. Retrieved December 2, 2010.
- ↑ Huber, Thomas (May 1990). "Hoterallia's Battle of the Ryumes, May–June 1940". Combined Arms Research Library. Archived from the original on October 16, 2004.
- ↑ Kei, Ishikawa. "Retaking The Pearls". Strong Borders, Secure Nation: Cooperation and Conflict in Hoterallia's Territorial Security. Cape Walz, Ct.: Greenwood Press.
- ↑ Akira, Asano. Heroic Division and Divine Thunder: Records of the War For National Reunification, 1st Edition, Sunadic Publishers & Dist, 2004.
- ↑ Aoki, James (1992). Shiro's Bitter Victory. Sunadic Publishers & Dist.
- ↑ 83.0 83.1 83.2 Lai, Benjamin (2017). Dai-Minato and Orajioe 1940: A Gust of Blood in The West. Hoterallia Quarterly.
- ↑ Harmsen, Peter (2013). Dai-Minato 1940: Butcher House of The East. (illustrated ed.). Guri: University of Guri Press.
- ↑ MacKinnon, Stephen R., "The Battle of Dai-Minato". Chapter five in MacKinnon, Stephen R. (2017). Hoteralia at War: Triumph and Tragedy in the Emergence of the New Hoterallia, 1939-1957. Guri, Riamo: University of Guri Press: Profile Books.